So you got a camera for Christmas...
- Stephanie Mumford
- Jan 18
- 3 min read

Photography can be a daunting world to step into as a beginner. There’s a plethora of new lingo, lots of gatekeeping, and MANY people who proclaim their expertise through an air of superiority. It can be intimidating.

Photography at the most basic level is the art of capturing light.
How you capture light and how the light interacts with your subject is where the magic happens. There are only three fundamental settings you need to know to begin and together they are called the Exposure triangle.
The Exposure Triangle
ISO - Light Sensitivity
Low ISO: use in daylight or well-lit settings
High ISO: use in low light
The higher the ISO the more grain or “noise” is introduced into the image.

Shutter Speed - Motion Control
Fast (smaller fraction ie. higher number on the bottom): freezes movement
Slow (larger fraction ie. lower number on the bottom or a whole number): motion blur, light trails

Aperture (f/stop) - depth + light
Low f/number: blurry background
High f/number: sharp foreground to background

Rule of thumb: adjust one, compensate with another ie. using a slower shutter speed will increase the exposure of the image and you will drop your ISO and/or raise your f/stop to compensate.
Which mode to start on
I would recommend starting with Aperture Priority (A/AV)
You control background blur, and the camera handles the rest
Ideal for portraits, lifestyle, travel and food
Starting with Aperture Priority will let you observe how your camera compensates for the other two sides of the exposure triangle while you are still familiarizing yourself with your camera.
Keep Your Focus
Out-of-focus and blurry photos are the bane of every photographer’s existence. Learning how to focus your camera and keep it in focus is crucial to ensuring you capture the moment.
Turn on Single Point AF or Face/Eye Detect
Tap or move the focus point to your subject
Half-press the shutter to lock focus
Do not let your camera choose the focus point randomly. You will end up with a random object in focus instead of the real subject.
White Balance
White balance controls the colour temperature of your image. Warmer = Orange, Cooler = Blue
Auto WB: fine for outdoors and natural light
Most cameras have different settings for daylight, cloudy, fluorescent lighting, etc., that you can experiment with in unnatural lighting conditions OR to add a slight colour grade to your footage.
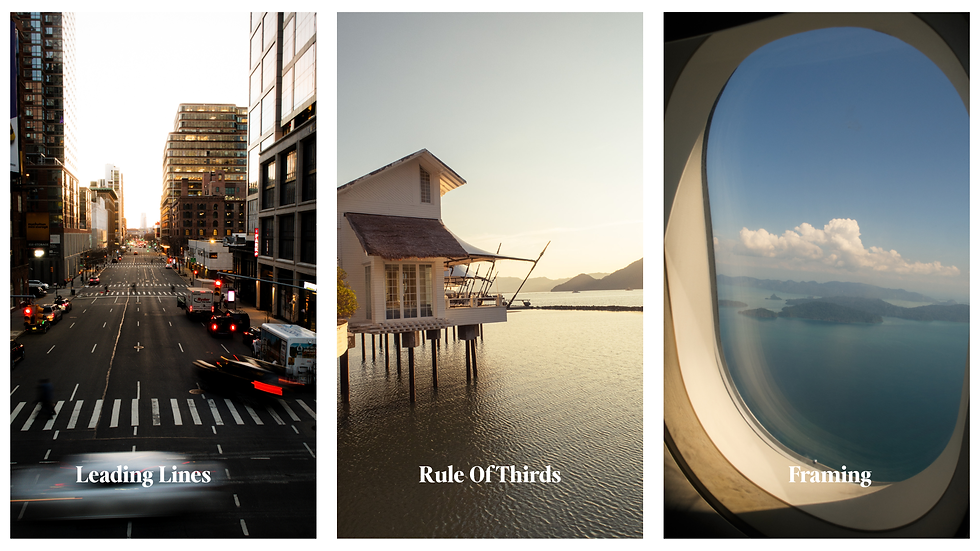
Composition Basics
Composition is about where the eye is drawn in photos and the balance of your image. When setting up your shot, think about where you want someone to look in the photo and how you are going to make them look without using your words.
Rule of Thirds: divides your image into 9 equal parts with two vertical and two horizontal lines. The theory is if you place your subject along one of these lines or at the intersection of the lines it creates a more engaging photo by using negative space to guide the eye towards the subject.
Leading Lines: Using roads, railings etc. to guide the eye towards a specific focal point. It creates a visual path for the viewer to follow.
Frame the Subject: Use elements like windows, doors, and arches to create a natural border around your subject.
File Settings
You only need to change these once from factory settings if your camera doesn’t come configured to the highest quality.
Photo Format: JPEG + RAW e
Aspect Ratio: 3:2 or 4:5 if you are only shooting for social media
Image Stabilization: ON if available


Comments