How to Use Your iPhone Beach Preset
- Stephanie Mumford
- Feb 28, 2025
- 2 min read

Updated: Feb 28, 2025


How to Use Your New iPhone Beach Preset
Before you get started editing you will need to add the preset to your Lightroom library.
How to Upload Lightroom Presets
Follow these simple steps to upload and install your Lightroom presets:
For Lightroom Classic (Desktop)
Open Lightroom Classic – Launch the application on your computer.
Go to the Develop Module – Click on the "Develop" tab in the top menu.
Open the Presets Panel – Locate the "Presets" panel on the left-hand side.
Import Presets
Click the + icon in the top right of the "Presets" panel.
Select “Import Presets” from the dropdown menu.
Navigate to the folder containing your downloaded preset files (.XMP format).
Select the presets and click Import.
Use Your Presets – Your new presets will now appear in the "Presets" panel under "User Presets" or their designated folder.
For Lightroom (Cloud-Based & Mobile)
On Desktop (Lightroom CC)
Open Lightroom CC and click on the "Edit" panel.
Click on the Presets button at the bottom right.
Click the ••• (three-dot menu) and choose “Import Presets”.
Select the .XMP preset files and click Import.
Your presets will now be available under the “Presets” tab.
On Mobile (Lightroom Mobile App)
Download the Preset Files – Ensure the preset files (.DNG format) are saved to your phone.
Import the DNG File
Open Lightroom Mobile and tap the + to add a new photo.
Select the DNG file and import it into your Lightroom library.
Create a Preset from the DNG File
Open the imported DNG image.
Tap the ••• (three-dot menu) in the top right and select "Create Preset".
Name your preset and select the settings you want to save.
Tap Save.
Now you’re ready to edit your photos with your newly uploaded presets! 🎨✨
How to Use Your Preset
Step 1: Apply your Beach 01 Preset to your photo.
Step 2: Adjust the lighting, contrast, highlights, and shadows to perfect the brightness, exposure and contrast in your photo. Every photo may require small tweaks because lighting conditions will differ!
Step 3: Crop & Straighten as required
How to Correct Orange Skin tones on Your Subject
Method 1: Desaturate the Orange HSL
This will correct the orange skin tone while also reducing the overall presence of orange across the photo as a whole. This method works well if you have a lot of white in your background as it will also help preserve the true tone of the white!
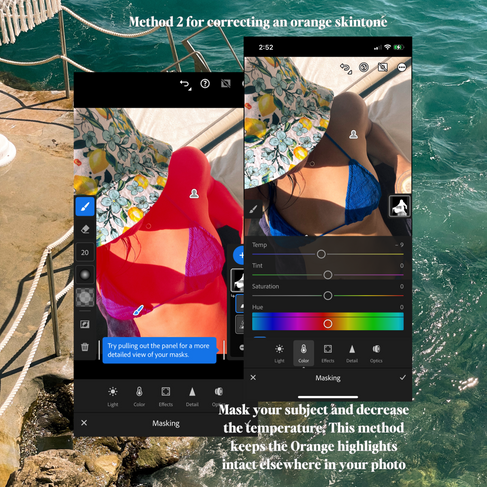
Method 2: Mask Your Subject (This is my preferred method)
Masking your subject and decreasing the temperature will reduce the orange skin tones while preserving the warmth in the rest of the photo. This method is my favourite as I can precisely target the subjects skin without changing the warmth and temperature of the rest of the photo.
Download my iPhone Beach Preset for Free!


Comments